 This post has been published more than 12 years ago, it may
be obsolete by now.
This post has been published more than 12 years ago, it may
be obsolete by now.
It’s been quite a while since I posted about the awesomeness of PhantomJS, the scriptable headless WebKit with JavaScript API.
In the meanwhile, I started coding a tiny lib to ease the creation of PhantomJS scripts, especially navigation scenarios.
Six months later, the lib has gained many more features and is now an entire project on its own; CasperJS was born and at the time these lines are written, the code repository has more than 180 watchers and 32 forks on Github.
Ariya Hidayat — the creator of PhantomJS — even says of it:
In case you haven’t seen CasperJS yet, go and take a look, it’s an extremely useful companion to PhantomJS. (source)
But what does it do?
I’m far too lazy not to quote CasperJS’ website:
CasperJS is an open source navigation scripting & testing utility written in Javascript and based on PhantomJS — the scriptable headless WebKit engine. It eases the process of defining a full navigation scenario and provides useful high-level functions, methods & syntactic sugar for doing common tasks such as:
- defining & ordering browsing navigation steps
- filling & submitting forms
- clicking & following links
- capturing screenshots of a page (or part of it)
- making assertions on remote DOM
- logging events
- downloading resources, including binary ones
- writing functional test suites, saving results as JUnit XML
- scraping Web contents
Hell, looks like some new coffee-machine… Let’s quickly review some of these features though.
Creating navigation scenarios
Scripting a browsing workflow using Javascript is painfully hard if you intend to use chained callbacks. This kind of code is a nightmare to write, to read, to understand and to maintain:
var page = require('webpage').create();

page.open(url1, function(status) {
    if (status == "fail") phantom.exit();
    page.open(url2, function(status) {
        if (status == "fail") phantom.exit();
        page.open(url3, function(status) {
            if (status == "fail") phantom.exit();
            page.open(url4, function(status) {
                if (status == "fail") phantom.exit();
                // Can I stop, now?
            });
        });
    });
});
Well, CasperJS solves this kind of problem using a convenient API for dealing with asynchronous stuff:
var casper = require('casper').create();

casper.start(url1);
casper.thenOpen(url2);
casper.thenOpen(url3);
casper.thenOpen(url4);

casper.run();
Want to simulate the user navigation as if he were clicking through links? No problem:
var casper = require("casper").create()
casper.start('http://my.blog.tld/');
casper.thenClick('nav#menu a.blog');
casper.thenClick('.posts li a');
casper.then(function() {
    this.echo('Page url is ' + this.getCurrentUrl());
    this.echo('Page title is ' + this.getTitle());
});

casper.run();
Note that you can alternatively use coffeescript to write your scripts:
var casper = require("casper").create()
casper.start "http://my.blog.tld/"
casper.thenClick "nav#menu a.blog"
casper.thenClick ".posts li a"
casper.then ->
    @echo "Page url is #{@getCurrentUrl()}"
    @echo "Page title is #{@getTitle()}"
casper.run()
Filling and handling forms
Filling and submitting a form is not much harder:
casper.start('http://admin.domain.tld/login/', function() {
    this.fill('form[id="login-form"]', {
        'username': 'chuck',
        'password': 'n0rr1s'
    }, true);
});

casper.then(function() {
    this.echo(this.getTitle());
});

casper.run();
Capturing screenshots
Capturing a screenshot of a given area is as easy as this:
casper.start('http://domain.tld/page.html', function() {
    this.captureSelector('capture.png', '.article-content');
});

casper.run();
Asynchronous rendering of page
Sometimes (ok, often), lots of stuff is loaded asynchronously through Ajax or any other fancy invention of the Devil. You can just wait for it to happen:
casper.start('https://twitter.com/casperjs_org', function() {
    this.waitForSelector('.tweet-row', function() {
        this.captureSelector('twitter.png', 'html');
    }, function() {
        this.die('Timeout reached. Fail whale?').exit();
    }, 2000);
});
Testing
Now all of this is fancy, but the true powers of CasperJS come from its functional testing capabilities. For example, testing google search can be done that way:
casper.start('http://www.google.fr/', function() {
    this.test.assertTitle('Google', 'google homepage title is the one expected');
    this.test.assertExists('form[action="/search"]', 'main form is found');
    this.fill('form[action="/search"]', {
        q: 'foo'
    }, true);
});

casper.then(function() {
    this.test.assertTitle('foo - Recherche Google', 'google title is ok');
    this.test.assertUrlMatch(/q=foo/, 'search term has been submitted');
    this.test.assertEval(function() {
        return __utils__.findAll('h3.r').length >= 10;
    }, 'google search for "foo" retrieves 10 or more results');
});

casper.run(function() {
    this.test.renderResults(true);
});
Running the suite would produce this shiny colored output:
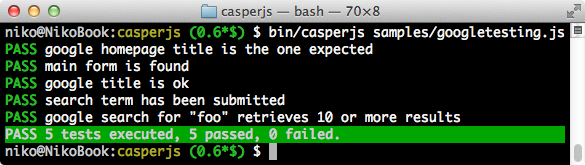
As a bonus, these results can be exported as XUnit XML, eg. for being consumed by a continuous integration server like Jenkins.
For the records, the whole CasperJS test suite is written using its own API, and results are visible on Travis-CI.
Now, what?
Nothing, really. If you think it’s useful, I’m glad enough.